This tutorial is just a guide. I want you to use a different set of images then the creator made. Use the one of the images below and the tutorial as a guide.
And use one of these Spiderman images as a base.


The tools and techniques we're going to cover are all very basic. With that in mind, I'm trying to write this for the beginner PSer. There will be lots of images showing the step-by-step progression, and I'll include particularly helpful keyboard shortcuts in parentheses where I can.
Please read the other tutorials. They are all excellent. For masking help, see arsi's "Merging" and Ironkite's "Dig" tutorials, and for coloring tips, refer to steveo's "Colorization" tutorial.
We are going to make something like this, but better.

Choose 1 Spiderman image and 1 Scooby-Doo image from above; try to use images that will go together..
Cut off the neck.
We could use the eraser here, but instead we're going to create a layer mask. Why a mask?
The eraser can be imprecise and if you remove a few pixels you later want to get back, you can't, at least not without undoing all the work you've done. Basically, it is an eraser tool with a simple undo. The layer mask is going to produce better results, so if you haven't tried using layer masks yet, you should start. Don't worry, it's easy.
Since we basically have Scooby’s head already cut out, we can just
{CTRL Left Click} on the layer, which will select everything in the layer. With your Scooby layer active in the layers window, click the "add layer mask" button at the bottom left, second one in:

This will create a mask around everything except the area you have selected. Think of it as a stencil and the white area is the visible area . Select your paintbrush tool (key b). Limit your colors to black and white, which they should be set to by default since you are in layer mask mode. Paint with black, and you can see the layer below. Paint with white over a masked area, and you bring back the pixels you had masked out. It's that easy. You could mess with using shades of gray, so let's keep it simple. Paint with black around Scooby's neck depending how much is revealed. Make sure in the layers window that the mask layer is active, and that your brush mode is set to normal and at 100% opacity. Use (key x) to toggle between black and white.

With a black brush with a soft edge, carefully paint out his neck.
Notice that Spiderman’s head shows through in the background and we need to fix that. With the rectangular marquee tool select and area like below. 
With the background layer selected, copy and paste this image. It will create a new layer. We will now deform this layer with the Warp Tool to hide Spiderman’s head behind Scooby Doo’s. Select this layer, and choose Edit > Transform > Warp. A lattice will appear and you can move the center points around to shrink his head. Be careful not to change the perimeter because then it will not align with the rest of the picture. Look the border is still fixed, but the center is deformed.
It should look something like this.
Before we change the color of Scooby’s head, we need to apply the layer mask. Right click on the B&W layer mask and choose Apply Layer Mask.
Change Scooby’s Color:
Select just Scooby’s head again. CTRL + Left Click on the layer’s image. With it still selected, press the Ying & Yang looking icon next to the create mask icon. Look below. Choose Hue/Saturation.
Adjust the Hue and the Saturation until the color is close.
Since we applied the hue/saturation to the whole head, his eyes, tongue,and nose changes color too. Paint out everything that you do not want to be red with the black paint brush. Make sure you paint in the mask layer.
Select your paintbrush tool (key b). Paint with black, and you can see the layer below. Paint with white over a masked area, and you bring back the pixels you had masked out. It's that easy. Make sure in the layers window that the mask layer is active, and that your brush mode is set to normal and at 100% opacity. Use (key x) to toggle between black and white.
If the over all color is still a bit off, you can further finesse it with the color. I just added 22 units of yellow or –22 on the RGB Color Level input. I think I nailed it.

Now we're getting somewhere. Use the move tool to place Scooby's face over Spider-man's face. If we reduce the opacity of the Scooby layer to 50%, we can see just how the two faces match up.
Selecting the original Spider-man layer, with the marquee selection tool draw a box around Spider-man’s head. Making sure you are in the correct layer, copy and then paste the head.
Rebuilding the facial webbing.
Notice that the curve at the top of Scooby's head matches quite nicely with the curve of Spider-man's head. Also the outline of the inside of Scooby's left (our right) eye is along the same angle as the one line of the webbing on Spider-man's face. These are going to be the two points where we will focus when we determine the final placement of the scooby layer.
First, we need to get the size and angle right. Use the transform tool (ctrl-t) to shrink Scooby's head a little more if necessary. With the transform tool still active, rotate Scooby's head a little bit counter-clockwise, paying close attention to the alignment of the eye and the top of the head.

Let's put this baby to bed.
If you are a little compulsive like I am, you're going to want to fix some of those web lines. I did it by zooming in way too far and copy-pasting single pixels on the spider-man layer to define the lines a little better and make them less blurry. More than a bit tiresome.
There are easier fixes. That little smidge of Spidey's right eye (our left) has to go. With the spider-man layer active, use the clone stamp (key s) to replace that offensive bit of white that is showing. Select pixels from the street to cover it.
I used a filter to get the highlight on the nose, but this is such an afterthought you might not want to bother. However, it helps in making the ears match up color-wise if you put a little shadow on them. I'll show you how I used it on the cheek layer, and the settings were similar on the rest of the layers, but I only got there through experimentation. Go to Filter>Render>Lighting Effects and the following menu will appear. As you see it, it is set to the settings I used on the cheek layer:

Alright. I also added some more color to the ears. That red wasn't quite right, so if you are playing along, switch your brush opacity to 40% change the setting to overlay, and find a red that matches a little too well, and paint those ears.
Looks like we're done. Let's make the title layer visible by clicking the eyeball icon next to it and ask the question: How did we do?
Original:

And here's the one I just made for the tutorial:
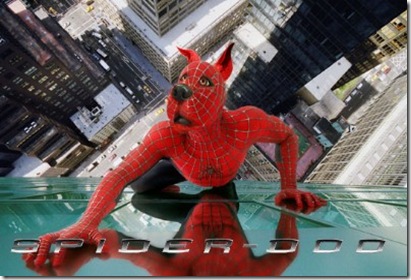
They look awfully close if you ask me. Yeehaw.


CUT OUT THE SPIDERMAN TEXT