Create a simple robotic looking leg.

- Add the Ikhandle between the hip_RT and then ankle_RT. Label it "IK_Handle_Ankle_RT"

Now go to the Skeleton menu and click on ‘IK Handle Tool’ options, and then from the ‘IK Handle Settings’ select IKRPsolver and create a IK handle from the Hip to Ankle joint.

Creating the Knee Controller
- Create a small triangle with the curve tool and place it in front of the Knee joint. Label it “Knee Controller” This will be used as a selectable control for the knee direction.
- Select the triangle and freeze the transformations - Modify > Freeze Transformations and center pivot – Modify > Center Pivot This will zero out everything in the channel box. This is especially when you want to return the controller to the starting point; just zero all the translate and rotate attributes.
- Select the Knee Controller (triangle) and then select the ikHandle_Ankle, under the constrain menu chose Pole Vector. This creates a direct relationship between the triangle and the Knee direction.
Setting up for the Reverse Foot
Now going to add IK SC handles to parent the reverse foot to. In the IK Handle settings change the solver to “Single Chain” or IKSCsolver.
-Add a IK SC Handle from the Ankle to the Ball. Label it “ikHandle_Ball”. These IK SC Handles will
-Add a IK SC Handle from the Ball to the Toe. Label it “ikHandle_Toe”

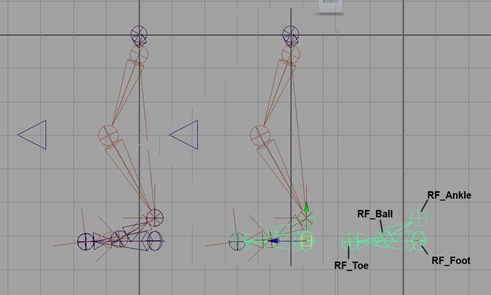
Create the Reverse Foot Lock starting on the Heel of the foot and going to the Toe then the Ball and finally the Ankle; Hence 'Reverse' since the joints are going backwards through the foot.
Label the joints accordingly, RF_Ankle, RF_Ball, RF_Toe, RF_Foot.
The Outliner
*It can be a bit difficult to select the newly created joints to label them. Open the Outliner and then you can select them from the list. They should be labeled Joint1, Joint2, Joint3, and Joint4.
Select the ikHandle_Ankle and then the RF_Ankle, press P for parent. Select the ikHandle_Ball then select the RF_Ball, press P for parent. Select the ikHandle_Toe and then the RF_Toe, press P for parent.
After you parent all the RF joints to the IK handles, the Outliner connections should look like this:

Setting up for the Reverse Foot
Now we are going to create the reverse foot
Create the Reverse Foot Lock starting on the Heel of the foot and going to the Toe then the Ball and finally the Ankle; Hence 'Reverse' since it's going backwards through the foot.
Label the joints accordingly, RF_Ankle, RF_Ball, RF_Toe, RF_Foot.
The Outliner
*It can be a bit difficult to select the newly created joints to label them. Open the Outliner and then you can select them from the list. They should be labeled Joint1, Joint2, Joint3, and Joint4.
Select the ikHandle_Ankle and then the RF_Ankle, press P for parent.
Select the ikHandle_Ball then select the RF_Ball, press P for parent.
Select the ikHandle_Toe and then the RF_Toe, press P for parent.
After you parent all the RF joints to the IK handles, the Outliner connections should look like this:
Create a foot controller and parent it to the RF_Foot.
- Create a NURBS circle and place it at the middle of the foot both vertically and horizontally.
- Select the circle and freeze the transformations. This will zero out everything in the channel box. This is especially when you want to return the controller to the starting point; just zero all the translate and rotate attributes.
- Select the RF_Foot and then the circle foot controller AND then press “p” to parent the RF_Foot to the circle.
Character Rigging In Maya


No comments:
Post a Comment